How To Find Your Cosmetic Leads
First log in to your Facebook account.
Then, click on the link below to visit the Facebook Ads Manager.
If this is the first time you are visiting the Facebook Ads Manager, it will now guide you through the steps to set up your account.
If you’ve already set up an Ads Manager, the link will bring you to your Ads Manager Dashboard and you can move to the next step below.
Login to your Facebook Ads Manager.
Hover your mouse over the left sidebar, then click on “Audiences.”
Click the blue “Create a Saved Audience” button.
You can create your audience in three easy steps.
- Name your audience
- Select the location for your audience
- Select your detailed targeting
Below to learn how to set up each of your audiences.
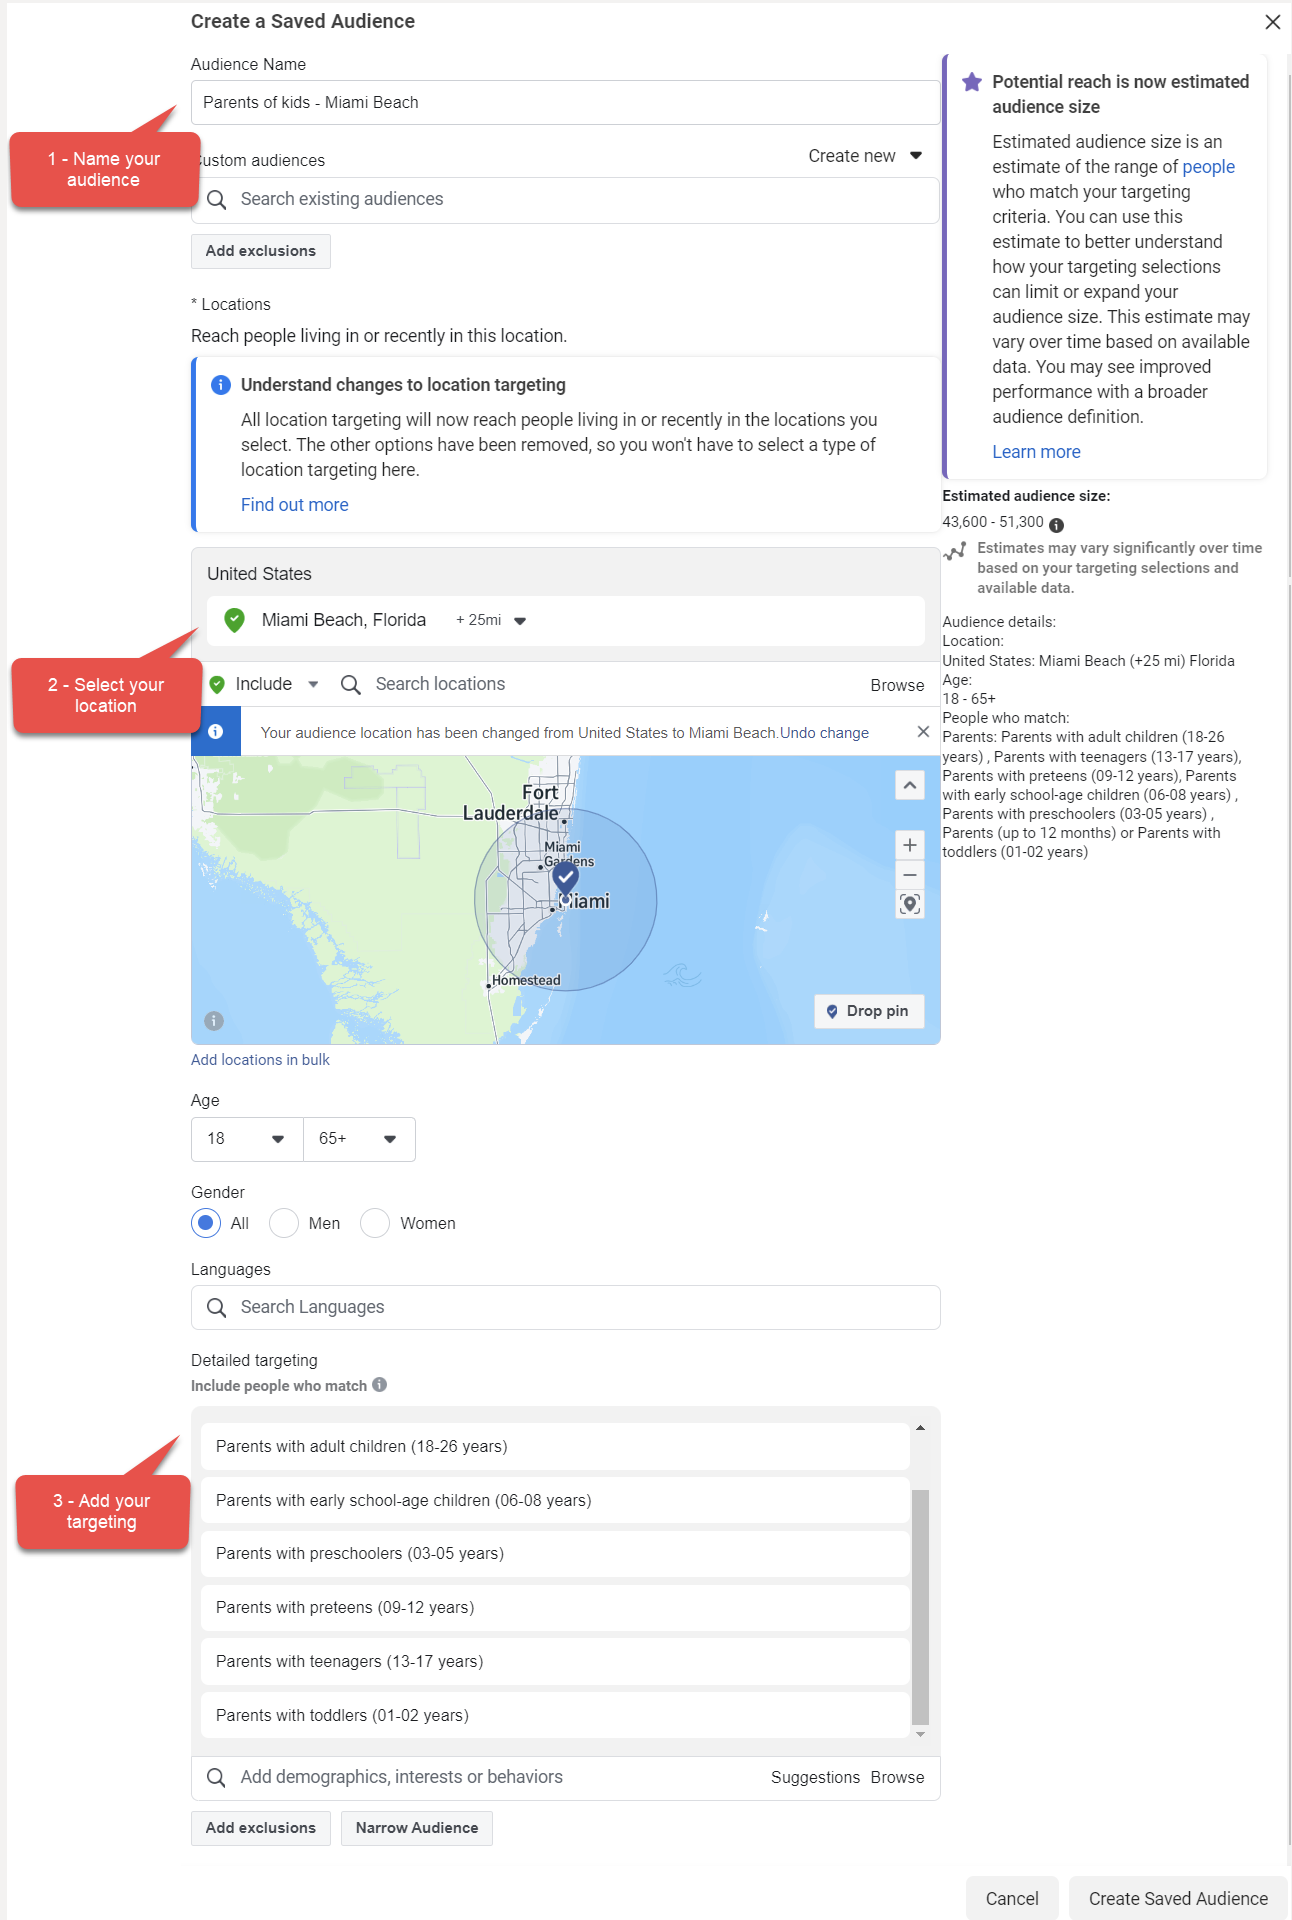
Audience 1: Parent of Kids
Audience Name: Parents of kids - City name
Location: Your city +25 mi
Detailed Targeting:
- Parents (up to 12 months)
- Parents with adult children (18-26 years)
- Parents with early school-age children (06-08 years)
- Parents with preschoolers (03-05 years
- Parents with preteens (09-12 years)
- Parents with teenagers (13-17 years)
- Parents with toddlers (01-02 years)

*Click image to view fullscreen
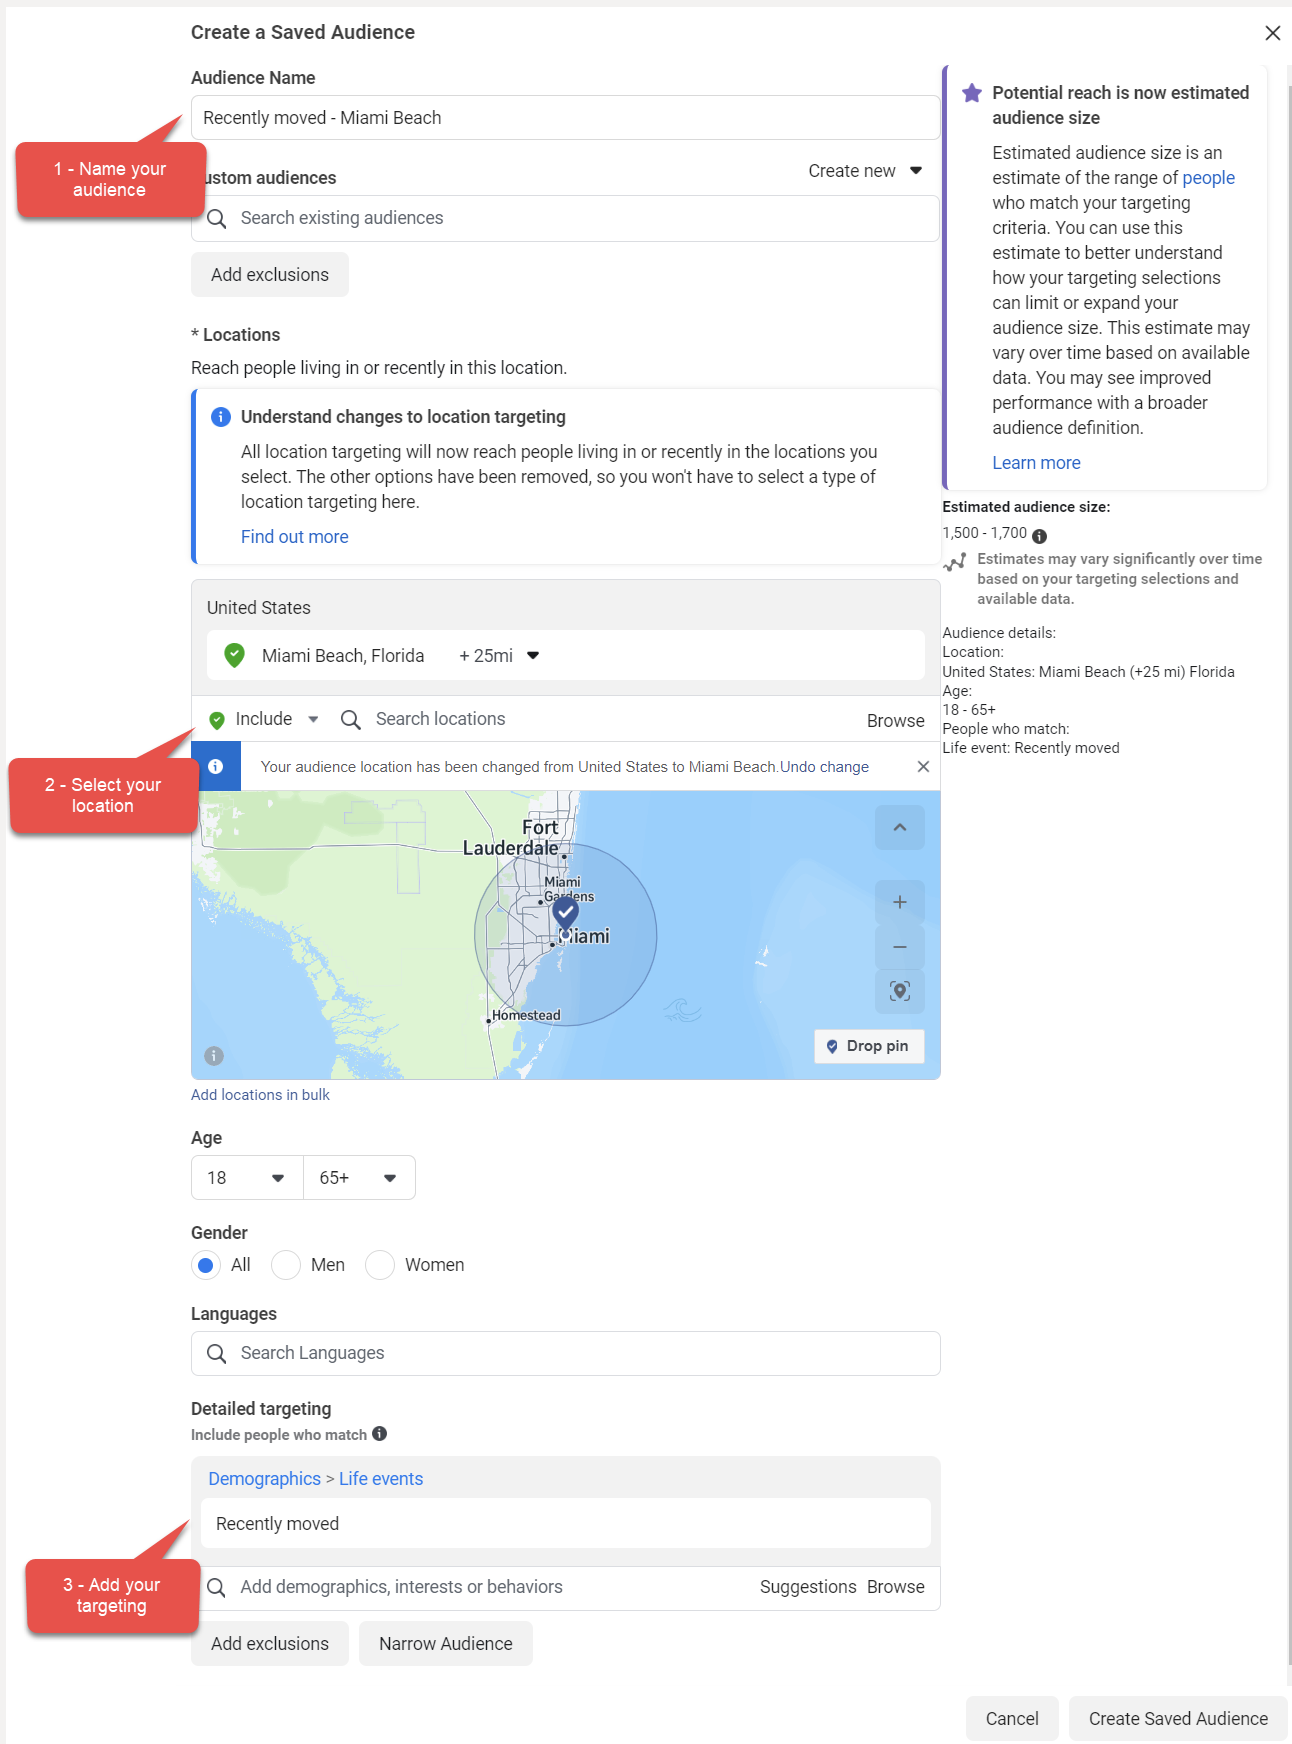
Audience 2: Recently Moved
Audience Name: Recently Moved - City name
Location: Your city +25 mi
Detailed Targeting:
- Recently moved

*Click image to view fullscreen
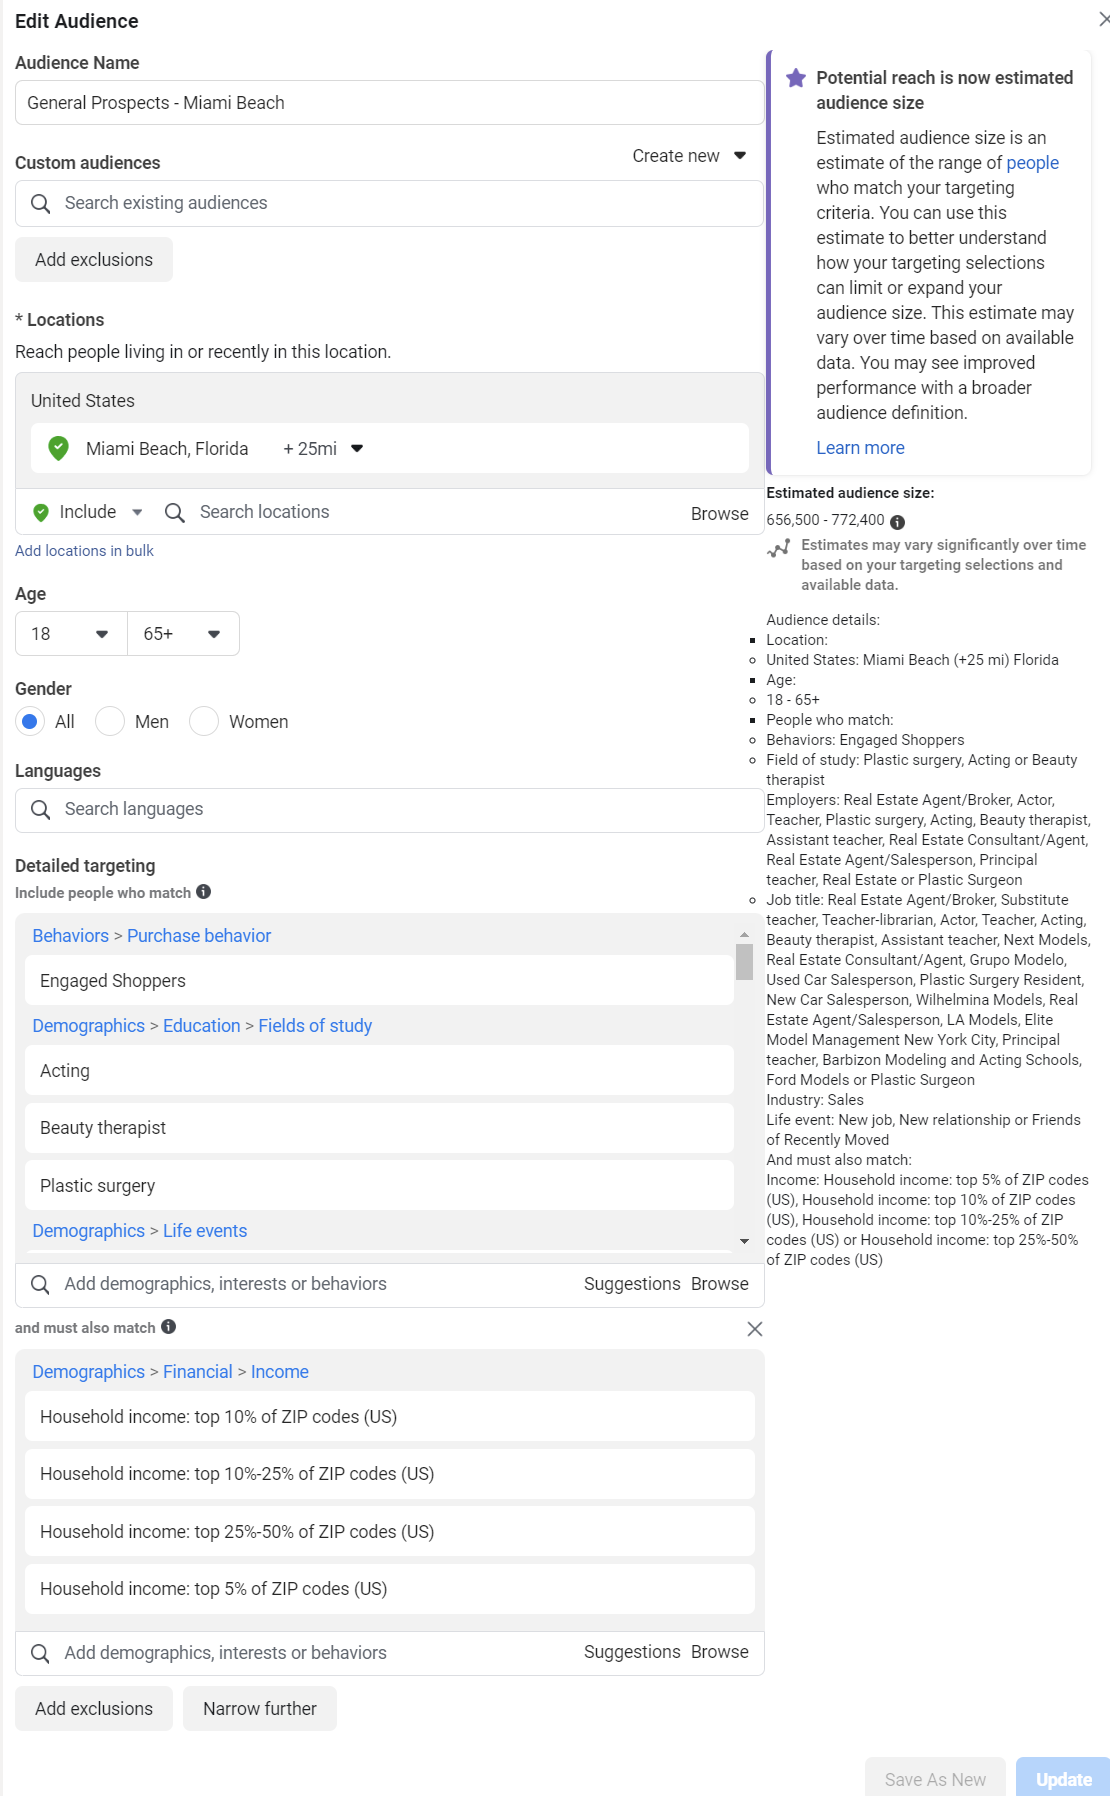
Audience 3: General Prospects
Audience Name: General Prospects - City name
Location: Your city +25 mi
Detailed Targeting:
- Behaviors: Engaged Shoppers
- Field of study: Plastic surgery, Beauty therapist or Acting
- Employers: Plastic Surgeon, Plastic surgery, Beauty therapist, Real Estate, Real Estate Agent/Salesperson, Real Estate Agent/Broker, Real Estate Consultant/Agent, Teacher, Assistant Teacher, Principal teacher, Acting or Actor
- Job title: Beauty therapist, Plastic Surgeon, Plastic Surgery Resident, Real Estate Consultant/Agent, Real Estate Agent/Salesperson, Real Estate Agent/Broker, New Car Salesperson, Used Car Salesperson, Teacher, Assistant Teacher, Substitute teacher, Principal teacher, Teacher-librarian, Elite Model Management New York City, Grupo Modelo, Ford Models, LA Models, Next Models, Wilhelmina Models, Barbizon Modeling and Acting Schools, Acting or Actor
- Industry: Sales
- Life event: Friends of Recently Moved, New relationship or New job
And must also match: - Income: Household income: top 25%-50% of ZIP codes (US), Household income: top 10%-25% of ZIP codes (US), Household income: top 10% of ZIP codes (US) or Household income: top 5% of ZIP codes (US)

*Click image to view fullscreen
Your Facebook pixel is a tracking code that you can place on your website. It will keep track of everyone who visits your website. This will allow you to target those people on Facebook with ads, as well as create lookalike audiences based on those people.
Here’s how you can set up your pixel and add it to your lead capture website.
Login to your Facebook Ads Manager.
Hover your mouse over the left sidebar, then click “All Tools,” then click on “Events Manager”
If you don't already have a Facebook Pixel setup, you can create one there by following this guide How to set up the Meta Pixel and events on your website
Click “Data Sources” and navigate to your pixel
Click “Add Events”
Click “Add New Integration”
Select “Meta Pixel” and click the blue “Set Up” button
Select “Manually Add Code to Your Website” and click the blue "Get Started" button
Copy the code
You can also add this code to your own website
To do this step you must first complete Step 3 - Set Up Your Facebook Tracking Code To Track Your Website Visitors
1 - Go to the Facebook Ads Audience page.
2 - Select “Create Custom Audience”
3 - Select “Website” and click “Next”
4 - Select your pixel code as the Source
5 - Select “All website visitors” as the Event
6 - Set the Retention to 180 days
7 - Name your audience
8 - Click the blue “CreateAudiencee” button
You can upload a list of your customers if you have permission to share their information. If you don’t have that permission, you may still be able to use them as a “Lookalike” audience in the next step. What this means is that you will not target them directly, but you will be able to target people that Facebook thinks are similar to them.
You need to do your own due diligence to make sure that you have the correct terms and permissions and that you’re not in breach of any laws before uploading your customer list to Facebook.
Here’s how to create your customer list.
1 - Create a list of your customers. Download them from your contact management software or wherever they are saved. You need to export their email and or phone number, plus you can include their name and city but it’s not required.
2 - Go to the Facebook Ads Audience page.
3 - Select “Create Custom Audience”
4 - Click “Next” on the Prepare List page
5 - Select “Customer List” and click next
6 - Upload your customer list
7 - Select “No, continue with a customer list that doesn't include customer value”
8 - Name your audience
9 - Check the box to agree
10 - Click “Next”
11 - Map your identifiers for email, phone, name, etc.
12 - Click “Import & create”
A Lookalike audience will help you reach new people who are similar to your other audiences. You can create a lookalike audience based on people who like your Page, conversion pixels or any of your existing Custom Audiences.
Here’s how to create a Lookalike audience.
1 - Go to the Facebook Ads Audience page.
2 - Click “Create a lookalike audience”
3 - Select your audience source
- Value-based sources - Here you can select a customer list that you’ve imported.
- Other sources - Here you can select your Facebook page to find people that have liked your page.
4 - Select your audience location
5 - Select your audience size, 0 - 1% is the best size.
6 - Click "Create audience"